前回からの続きです。
作成したCargoパッケージをnpmパッケージから使う
さて、前回までの状態だとhello-wasm-packを使っているので、せっかくRustで作ったwasmを使えていません。
使用できるようにするため、まずは前回wasm-pack buildで作成したpkgディレクトリに移動し、npm linkというコマンドを実行します。
このコマンドを使うと、npmパッケージをパブリッシュせずに相互に参照することが可能になるそうです。へー。
{{ url_title “https://qiita.com/k_kind/items/b3d04bd5a47ee26b6e2d" }}
さっそく実行してみます。
% npm link

added 1 package, and audited 3 packages in 713ms

found 0 vulnerabilities
実行すると、npm install --globalで指定した際のディレクトリにシンボリックリンクが作成されます。
% ls -l /home/username/.anyenv/envs/nodenv/versions/17.9.0/lib/node_modules
lrwxrwxrwx  1 username username   59  8月  8 22:56 wasm-game-of-life -> ../../../../../../../Project/personal/wasm-game-of-life/pkg
nodenvを使っているのでこのようなディレクトリになっています。
nodenvはバージョンごとにグローバルなパッケージがインストールされるディレクトリが変わるので、もしnodenvで開発する場合はnodeのバージョンはpkgとwwwの両方のディレクトリで合わせる必要があります。
.node-versionの配置を忘れないようにしないといけませんね!
では続けて、wwwディレクトリに移動して、先程作成したリンクへの依存を追加していきます。
npm link wasm-game-of-life
このコマンドを実行すると、node_modulesの中にwasm-game-of-lifeへのシンボリックリンクが作成され、先程作成したシンボリックリンクと紐付きます。
つまり、pkgへのシンボリックリンクを持つことになります。
# wwwディレクトリで実行
% ls -l node_modules | grep wasm-game-of-life
lrwxrwxrwx  1 username username     9  8月  8 23:06 wasm-game-of-life -> ../../pkg
最後に、www/index.jsのインポートをwasm-game-of-lifeモジュールを参照するようにしてあげれば完成です!
import * as wasm from "wasm-game-of-life"; // npm linkで作成したパッケージへの参照に切り替え

wasm.greet();
早速起動してみましょう。
% npm start

> create-wasm-app@0.1.0 start
> NODE_OPTIONS=--openssl-legacy-provider webpack-dev-server

(node:198068) [DEP0111] DeprecationWarning: Access to process.binding('http_parser') is deprecated.
(Use `node --trace-deprecation ...` to show where the warning was created)
ℹ 「wds」: Project is running at http://localhost:8080/
ℹ 「wds」: webpack output is served from /
ℹ 「wds」: Content not from webpack is served from /home/username/Project/personal/wasm-game-of-life/www
ℹ 「wdm」: Hash: adbf04913b427e1cc8a5
Version: webpack 4.43.0
Time: 555ms
Built at: 2023/08/08 23:15:24
                           Asset       Size  Chunks                         Chunk Names
                  0.bootstrap.js   5.85 KiB       0  [emitted]
                    bootstrap.js    369 KiB    main  [emitted]              main
e404062889458e4ce0ca.module.wasm  356 bytes       0  [emitted] [immutable]
                      index.html  297 bytes          [emitted]
Entrypoint main = bootstrap.js
[0] multi (webpack)-dev-server/client?http://localhost:8080 ./bootstrap.js 40 bytes {main} [built]
[../pkg/wasm_game_of_life.js] 178 bytes {0} [built]
[./bootstrap.js] 279 bytes {main} [built]
[./index.js] 57 bytes {0} [built]
[./node_modules/ansi-html/index.js] 4.16 KiB {main} [built]
[./node_modules/ansi-regex/index.js] 135 bytes {main} [built]
[./node_modules/strip-ansi/index.js] 161 bytes {main} [built]
[./node_modules/webpack-dev-server/client/index.js?http://localhost:8080] (webpack)-dev-server/client?http://localhost:8080 4.29 KiB {main} [built]
[./node_modules/webpack-dev-server/client/overlay.js] (webpack)-dev-server/client/overlay.js 3.51 KiB {main} [built]
[./node_modules/webpack-dev-server/client/socket.js] (webpack)-dev-server/client/socket.js 1.53 KiB {main} [built]
[./node_modules/webpack-dev-server/client/utils/createSocketUrl.js] (webpack)-dev-server/client/utils/createSocketUrl.js 2.91 KiB {main} [built]
[./node_modules/webpack-dev-server/client/utils/log.js] (webpack)-dev-server/client/utils/log.js 964 bytes {main} [built]
[./node_modules/webpack-dev-server/client/utils/reloadApp.js] (webpack)-dev-server/client/utils/reloadApp.js 1.59 KiB {main} [built]
[./node_modules/webpack-dev-server/client/utils/sendMessage.js] (webpack)-dev-server/client/utils/sendMessage.js 402 bytes {main} [built]
[./node_modules/webpack/hot sync ^\.\/log$] (webpack)/hot sync nonrecursive ^\.\/log$ 170 bytes {main} [built]
    + 23 hidden modules
ℹ 「wdm」: Compiled successfully.
無事起動しました。

アラートメッセージも切り替わっていますね。やったー
npm linkの注意点
補足ですが、npm linkは開発時にはかなり役立つ機能だと思います。
「開発速度を上げるため、リアルタイムに変更を適用したい」ということは、プロジェクトではよくあることなので。
ただ、npm linkによる依存はpackage.jsonやpackage-lock.jsonには記載されません。
そのため、しっかり依存管理を行いたいならちゃんとdependenciesに書いてあげる必要があります。
Yarnでローカルのパッケージをaddする方法 #JavaScript - Qiita
greet関数に変数を渡せるようにする
少し話がそれましたが、次にgreetに引数を追加して変数を渡せるようにします。
まず、src/lib.rsに定義したgreet関数を修正します。
#[wasm_bindgen]
pub fn greet(s: &str) { // 文字列を受け取る
    alert(format!("Hello, {}!", s).as_str()); // 引数を組み込んだ文字列をアラートする
}
次に、再度pkgをビルドします。
% wasm-pack build
[INFO]: 🎯  Checking for the Wasm target...
[INFO]: 🌀  Compiling to Wasm...
   Compiling wasm-game-of-life v0.1.0 (/home/username/Project/personal/wasm-game-of-life)
warning: function `set_panic_hook` is never used
 --> src/utils.rs:1:8
  |
1 | pub fn set_panic_hook() {
  |        ^^^^^^^^^^^^^^
  |
  = note: `#[warn(dead_code)]` on by default

warning: `wasm-game-of-life` (lib) generated 1 warning
    Finished release [optimized] target(s) in 0.25s
[INFO]: ⬇️  Installing wasm-bindgen...
[INFO]: Optimizing wasm binaries with `wasm-opt`...
[INFO]: Optional fields missing from Cargo.toml: 'description', 'repository', and 'license'. These are not necessary, but recommended
[INFO]: ✨   Done in 1.01s
[INFO]: 📦   Your wasm pkg is ready to publish at /home/username/Project/personal/wasm-game-of-life/pkg.
成功しましたね。
ビルド後の型定義ファイルを確認すると、文字列を受け取るようになっています。
// pkg/wasm_game_of_life.d.ts

/* tslint:disable */
/* eslint-disable */
/**
* @param {string} s
*/
export function greet(s: string): void;
修正に合わせて、www/index.jsも修正します。
import * as wasm from "wasm-game-of-life";

wasm.greet("get argument");
再度npm startして、ブラウザで確認してみましょう。

引数の内容になっています!
ライフゲームの概要
これまでで簡易的な実装はできました。
ここからはチュートリアルの本題であるライフゲームについて理解していきます。
ライフゲーム (Conway’s Game of Life) は1970年にイギリスの数学者ジョン・ホートン・コンウェイ (John Horton Conway) が考案した生命の誕生、進化、淘汰などのプロセスを簡易的なモデルで再現したシミュレーションゲームである。単純なルールでその模様の変化を楽しめるため、パズルの要素を持っている。
ルールの説明は以下のとおりです。(こちらもWikiから引用)
ライフゲームでは初期状態のみでその後の状態が決定される。碁盤のような格子があり、一つの格子はセル(細胞)と呼ばれる。各セルには8つの近傍のセルがある (ムーア近傍) 。各セルには「生」と「死」の2つの状態があり、あるセルの次のステップ(世代)の状態は周囲の8つのセルの今の世代における状態により決定される。
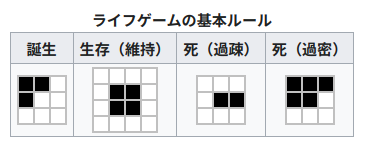
セルの生死は次のルールに従う。
- 誕生
- 死んでいるセルに隣接する生きたセルがちょうど3つあれば、次の世代が誕生する。
- 生存
- 生きているセルに隣接する生きたセルが2つか3つならば、次の世代でも生存する。
- 過疎
- 生きているセルに隣接する生きたセルが1つ以下ならば、過疎により死滅する。
- 過密
- 生きているセルに隣接する生きたセルが4つ以上ならば、過密により死滅する。
なんか、なんとなく分かるようなわからないような…?
これを実装していきます。
wasmアプリの設計における注意点
早速実装していきます。
Implementing Life - Rust and WebAssembly
その前に、理解すべき重要な概念があるようです。
JavaScript’s garbage-collected heap — where Objects, Arrays, and DOM nodes are allocated — is distinct from WebAssembly’s linear memory space, where our Rust values live. WebAssembly currently has no direct access to the garbage-collected heap (as of April 2018, this is expected to change with the “host bindings” proposal). JavaScript, on the other hand, can read and write to the WebAssembly linear memory space, but only as an ArrayBuffer of scalar values (u8, i32, f64, etc…). WebAssembly functions also take and return scalar values. These are the building blocks from which all WebAssembly and JavaScript communication is constituted.
和訳:JavaScript のガベージ コレクション ヒープ (オブジェクト、配列、DOM ノードが割り当てられる場所) は、Rust 値が存在する WebAssembly のリニア メモリ空間とは異なります。 現在、WebAssembly はガベージ コレクション ヒープに直接アクセスできません (2018 年 4 月の時点では、これは「ホスト バインディング」提案によって変更される予定です)。 一方、JavaScript は、WebAssembly 線形メモリ空間に対して読み書きできますが、スカラー値 (u8、i32、f64 など) の ArrayBuffer としてのみ可能です。WebAssembly関数は、スカラー値を受け取り、スカラー値を返します。これらは、すべてのWebAssemblyおよび JavaScript 通信を構成する構成要素です。
まずそもそも線形メモリってなんぞや?って話なんですが、wasmが扱えるメモリは今の所単純な値のやりとりを想定していて、通常のヒープメモリのようには使えないから「線形メモリ」と表現しているそうです。
以下のブログのほうがわかりやすい解説になっています。
|詳説|線形メモリとArrayBuffer |〜 wasm-bindgenではどのように文字列を扱っているのか?〜 - Mi in progress
コードを見たほうがわかりやすいかもしれません。
以下はwasm-pack buildで生成されたpkg/wasm_game_of_life_bg.jsの中身です。
let wasm;
export function __wbg_set_wasm(val) {
    wasm = val;
}


const lTextDecoder = typeof TextDecoder === 'undefined' ? (0, module.require)('util').TextDecoder : TextDecoder;

let cachedTextDecoder = new lTextDecoder('utf-8', { ignoreBOM: true, fatal: true });

cachedTextDecoder.decode();

let cachedUint8Memory0 = null;

function getUint8Memory0() {
    if (cachedUint8Memory0 === null || cachedUint8Memory0.byteLength === 0) {
        // wasm.memory.bufferが線形メモリ
        // 線形メモリをUint8Arrayにしています。
        cachedUint8Memory0 = new Uint8Array(wasm.memory.buffer);
    }
    return cachedUint8Memory0;
}

function getStringFromWasm0(ptr, len) {
    ptr = ptr >>> 0;
    // 線形メモリの内容を文字列に変換しています。
    return cachedTextDecoder.decode(getUint8Memory0().subarray(ptr, ptr + len));
}

let WASM_VECTOR_LEN = 0;

const lTextEncoder = typeof TextEncoder === 'undefined' ? (0, module.require)('util').TextEncoder : TextEncoder;

let cachedTextEncoder = new lTextEncoder('utf-8');

const encodeString = (typeof cachedTextEncoder.encodeInto === 'function'
    ? function (arg, view) {
    return cachedTextEncoder.encodeInto(arg, view);
}
    : function (arg, view) {
    const buf = cachedTextEncoder.encode(arg);
    view.set(buf);
    return {
        read: arg.length,
        written: buf.length
    };
});

function passStringToWasm0(arg, malloc, realloc) {

    if (realloc === undefined) {
        const buf = cachedTextEncoder.encode(arg);
        const ptr = malloc(buf.length, 1) >>> 0;
        getUint8Memory0().subarray(ptr, ptr + buf.length).set(buf);
        WASM_VECTOR_LEN = buf.length;
        return ptr;
    }

    let len = arg.length;
    let ptr = malloc(len, 1) >>> 0;

    const mem = getUint8Memory0();

    let offset = 0;

    for (; offset < len; offset++) {
        const code = arg.charCodeAt(offset);
        if (code > 0x7F) break;
        mem[ptr + offset] = code;
    }

    if (offset !== len) {
        if (offset !== 0) {
            arg = arg.slice(offset);
        }
        ptr = realloc(ptr, len, len = offset + arg.length * 3, 1) >>> 0;
        const view = getUint8Memory0().subarray(ptr + offset, ptr + len);
        const ret = encodeString(arg, view);

        offset += ret.written;
    }

    WASM_VECTOR_LEN = offset;
    return ptr;
}
/**
* @param {string} s
*/
export function greet(s) {
    const ptr0 = passStringToWasm0(s, wasm.__wbindgen_malloc, wasm.__wbindgen_realloc);
    const len0 = WASM_VECTOR_LEN;
    wasm.greet(ptr0, len0);
}

export function __wbg_alert_d3b6e8db27c82dfa(arg0, arg1) {
    alert(getStringFromWasm0(arg0, arg1));
};
面白いですね。
この仕様を踏まえて、wasmアプリの設計時に考慮すべきポイントは以下の2つです。
- WebAssemblyリニアメモリに対するコピーを最小限に抑える
- シリアライズとデシリアライズを最小限に抑える
シリアライズについてはしっくりこなかったんですが、serdeとか使ってシリアライズした構造体を直接渡すなってことですかね?
このIssueを見る限り、構造体については#[wasm_bindgen]マクロを宣言した状態し、ポインタで渡すようです。
"Opaque Pointer" pattern · Issue #1242 · wasm-bindgen/wasm-bindgen · GitHub
この辺は一筋縄じゃいかなそうなので、必要な場面になったらまた理解し直します。()
ライフゲームの設計
先程の通り、コピーやシリアライズは最小限に抑えてwasmとjs間で値をやりとりしなければいけません。
このゲームでは盤上のことをよく「宇宙」と表現しているため、ここでも宇宙という単語を使います。
ここでは4 * 4のマスからなる宇宙を想像します。

このマスに番号を振ります。

これを一列にしてあげると、メモリに置けそうな形になりますね。
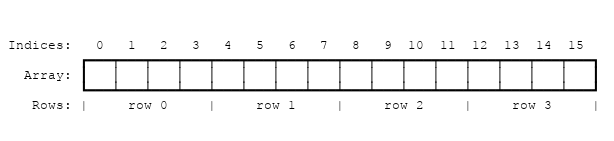
ここで、特定のマスにアクセスするための式は以下のとおりです。
index(row, column, universe) = row * width(universe) + column
universeが盤上のサイズのことですね。4 * 4の正方形なので4です。
まとめ
随分長いこと書いてしまいました。。
続きではやっとライフゲームの実装に入っていきます。
乞うご期待!